I've never made a quilt before, but thought I would give it a try. I will get right to the point. It gets on my nerves when I go to read a blog post for a recipe or crochet pattern and there is so much babbling before getting to the point. I never read through it on other blogs, so I won't do it here! :)
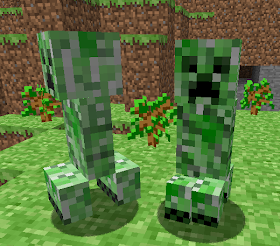
My son loves to play the video game, Minecraft. This is what a Creeper looks like in the game.
My supplies. You'll see how I like bargains.
Rotary cutter, acrylic guide/ruler, cutting mat (borrowed from my mom)
Quilt batting, 50% off at Joann's
Twin size black flat sheet, $4.97 at Walmart
1 1/3 yard black fabric, used a 50% off coupon at Joann's
Two 5-pack fabric quarter bundles and 3 single fabric quarters (total of 13), all 50% off at Joann's.
3 spools thread (I actually only used one of the green spools)
I also used a 15% off total fabric purchase coupon
(And bought several other skeins of yarn on sale at Joann's, but that's another blog post, lol!)
Ok, so I'm happy with how much money I have in the project, in case I mess it up! ;)
First, I ironed all fabric pieces to remove wrinkles.
The fabric quarters come 18"x21" and I cut each one into (4) 9" squares (with a strip left over of course). I needed 50 green squares so I had 2 extras for "just in case". I took 10 of those green squares and cut them in half down the middle. You'll see why in a minute.
I cut the 1 1/3 yard of black fabric into (20) 9" squares.
Using the rotary cutter made the cutting SO much easier than trying to cut straight lines with scissors! I made sure every side was straight, and also cut off the selvage edges.
I designed my pattern using a spreadsheet on the computer. I had 7 different shades of green fabric and after writing down how many squares I had of each color, I numbered the squares on the design so that no two squares of the same shade were touching side by side. Because of the width of the twin sheet for the back of the quilt, I couldn't get a full 9" square on each side of the Creeper face, so that's why I cut 10 of the squares in half. It gave me (20) 4 1/2" x 9" rectangles for the sides.
I numbered my stacks according to where they will go on the design and pulled them from the stacks as I needed them.
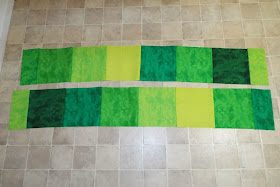
I started with the top row and stitched them together side by side using 1/4" seam allowance.
Once I had two rows done, I stitched those to each other.
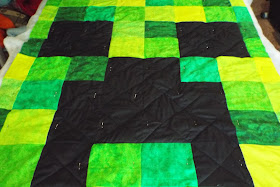
I continued from top to bottom until done with the quilt top. Everything lined up pretty good!
Thank goodness for the ping pong table, lol! (Otherwise I would use a table or the floor.)
First I laid out the twin flat sheet, then the quilt batting.
Just a tip: If I had it to do over, I would tape down the sheet in a few places to help avoid wrinkles. I do have a few little puckers here and there after stitching.
I tried to center everything on the sheet to allow at least 1 1/2" all around the sheet for binding.
Lay the top over the quilt batting.
Another tip: I would get better quilt batting next time. I have since read online that all-cotton batting is better recommended. The stuff I used has to be stitched or tied every 5 inches and sometimes doesn't hold up well in the laundry. We'll see.
I put a safety pin in every square to hold the layers together.
Close up view of safety pin placement. I alternated which side of the square they were on.
I machine stitched around the edge of each black square. This is called sewing "in the ditch". You pull the squares tight and can see the "ditch" in between the squares. If you stay in the ditch, this row of stitching will be nearly invisible on top.
Then I also sewed an X across each black square. I didn't mark it out ahead of time. I simply "eye-balled" it. Yeah, I'm a rebel like that. ;)
Then I also sewed an X across each black square. I didn't mark it out ahead of time. I simply "eye-balled" it. Yeah, I'm a rebel like that. ;)
It was not easy making sure the weight of the quilt was always evenly distributed as I was sewing, especially while sewing in the center of the quilt and trying to bunch it up to get through the space in my machine!
Tip: I turned at the corners and sewed continuously as much as possible. Each time you're about to begin a lot of sewing, make sure there is plenty of thread on the spool AND the bobbin!
Ok, the black squares are done.
Another view of the black squares. I see in this pic, I hadn't yet sewed in the ditch horizontally across the center of the big black square. Can you tell?
From this point on, I didn't take any pictures. I switched to green thread on top, and black thread in the bobbin. I then sewed "in the ditch" around every green square. After that, it was ok to remove all of the safety pins.
Next, using black cotton yarn and a yarn needle, I tied the center of each green square. Be sure to poke down through all 3 layers and back up very close to where you went down. I left both yarn ends about 3" long and tied them in double knots.
Using scissors, I trimmed the quilt batting around the edge to be even with the quilt top.
Using the rotary cutter, ruler guide, and cutting mat, I trimmed the black sheet to 1 1/2" bigger than the quilt top on all sides. I may go back and trim them a little shorter.
To create the binding: Using my iron, I folded the black sides over to meet the edge of the quilt top, then folded over again coming up over the quilt top. Then I stitched around the edge through all layers.
It was a lot of work! I certainly won't be entering any quilt shows with it as there are a lot of little puckers here and there, but my son is very proud of it! (And so am I.)


I love this! I'm going to make two of them!
ReplyDeleteThanks Melissa! Would love to see when you're finished. :)
DeleteI have been quilting for yrs. puckers happen to the best of us. this being your first quilt.. the only word I have for your is WOW!!!! you did a fabulous job!!! I quilt for a living. what I learned the most.. if a quilt is perfect..its not homemade. your son has a right to be proud.. his momma did a wonderful job. the love made it special. that's what its about.
DeleteThank you so much Kathy!
Deletewould this fit a twin size bed for someone looking for twin size quilt? Thanks
ReplyDeleteYes, my son uses it on his twin size bed.
DeleteWOW!
ReplyDeletei'm going to make this
ReplyDeleteThank you for posting this!
ReplyDeleteWow!!! I wish I had thought about making this for my son earlier for Christmas this is amazing!
ReplyDeleteThanks Tiffany! :)
DeleteThank you so much for this tutorial! I just got my first top done, all that's left now is to quilt it :D I'm going to digitize some files and use my embroidery machine to quilt it :D
ReplyDeleteThat would look awesome! I would love to see a picture of it when you're done!
DeleteThank you so much. Fabulous job of explaining all the steps. Going to do one for my 4-yr old grandson who loves creeper.
ReplyDeleteThanks Barbara! I'm sure your grandson will love his quilt!
DeleteThis may be my first quilt! Three months until my son's birthday. I live overseas, so I'll have to order all the fabric. I'm thinking a matching pillow sham, too. And maybe some black sheets? Thanks!
ReplyDeleteMy sister's grandson is looking to decorate his new room in Minecraft...Looks like Aunt Anna will have a new project to work on! Thanks for the terrific instructions!
ReplyDeleteThis comment has been removed by the author.
ReplyDeleteYou are awesome! Just found this post. I was really looking for someone who was a beginner in quilting. I was feeling slightly overwhelmed at taking on this task but I feel more at ease now. My son is a HUGE Minecraft fan. I can't wait to see his face when i give this to him. Thanks for the instructions :)
ReplyDeleteI just made this quilt for my grandson, who loves Minecraft. The worst part, for me, was sewing the diagonal lines through the black squares. Whew! Quite a few puckers for me too, I am not a quilting expert, but I think my grandson will love it just the same.
ReplyDeleteI'm sure he will love it Pam! :)
DeleteSo I am doing one for my grandson 8th birthday
ReplyDeleteYou were only one who gave block sizes. Gee you think that would be the first thing you tell us.
OK so I have all black blanket and the checker board material so'all I have to do is cut face squares.
ARE THEY
9" x 9" black square for face and how màny squares
Did u use for eyes, mouth etc. Today is Tuesday Feb. 9,2016. I need too finish this quilt today or tomorrow when I get a response. What is finished measurements of the whole quilt. Is it twin?
God Bless you
Debra in Arizona.
I think it is 20- 9"x9" squares you are the best. See since October, 2014-February, 2016 this is still being use. You are the best.
ReplyDeleteDebra in Arizona 2-9-2016
Hi Debra! Thanks for the compliments. Yes, the black squares are 9"x9" as well. There are 20 black squares - four on each eye, then the rest are on the mouth. And yes, it is twin size when finished. GOOD LUCK! :)
DeleteThanks forgot to tell you for help. I was surprised that I got an answer. I didn't think anyone did. I am so happy you did. I will sent a pic when I figure out how. You ate the best.
ReplyDeleteThanks forgot to tell you for help. I was surprised that I got an answer. I didn't think anyone did. I am so happy you did. I will sent a pic when I figure out how. You ate the best.
ReplyDeleteCan someone make me one? Crafty I am NOT!!!
ReplyDeletesunshineforyouinnj@gmail.com
fantastic. what a lot of work!!! I couldn't do it...
ReplyDeleteWould you be willing to make and sell one? My son has been obsessed with mine craft for years now and is wanting a room makeover and he'd love this!
ReplyDeleteThank you for sharing, I made one for my grandson by using your patteren
ReplyDeleteHi, I love this bedding and my daughter wants one just like it for a duvet cover for her twin bed but in pink. Is anyone interested in making it for me and what would it cost to have it made?
ReplyDeleteSo cute!